What is Submagic?
Submagic is an AI video-editing platform that creates short-form videos from longer-form content. It uses artificial intelligence to analyze your long-form videos, identify the most engaging moments, and automatically turn them into bite-sized clips that work perfectly for platforms like Instagram Reels, TikTok, and YouTube Shorts.
Submagic recently introduced Submagic 2.0: it’s the fastest and most advanced version yet! You’ll get lightning-fast uploads, smoother exports, and better previews in a sleek interface.
Who is Submagic Best For?
Submagic is best for anyone involved in social media marketing. It’s particularly beneficial if you need to create engaging captions and videos for platforms like Instagram, TikTok, and YouTube.
- Content creators can use Submagic to boost their social media presence with captivating captions and videos.
- Influencers can use Submagic to maintain a consistent and engaging presence across multiple platforms.
- Business owners can use Submagic to create compelling content for marketing campaigns.
- Podcasters can use Submagic to repurpose podcast episodes into engaging video clips.
- Social media marketers can use Submagic for efficient content creation and optimization.
- Marketing teams can use Submagic to maintain a consistent presence across multiple platforms without hiring additional editors.
- Agencies can use Submagic to manage content for multiple clients.
Submagic Key Features
Submagic offers several key features to streamline content creation:
- AI Clip Maker: Automatically detects and extracts the best parts of long videos to create engaging short clips.
- Auto-Framing: Optimizes videos for vertical formats like TikTok, YouTube Shorts, and Instagram Reels.
- AI Remove Filler Words: Eliminates filler words like “um” and “uh” to enhance professionalism.
- Remove Bad Takes: Easily remove unwanted parts of your video
- Auto Subtitles: Generates accurate captions in over 50 languages with options for animated emojis, colors, and GIFs.
- SRT File Export: Download captions in SRT format to use in various video players and editing software.
- 4K Export and 60 FPS: High-quality video output options are available on the higher-tier plans.
- Auto B-Roll: Adds royalty-free B-roll footage or allows the import of custom media.
- Auto Transitions: Creates smooth transitions between clips.
- Auto Zoom: Automatically add zoom transitions between clips.
- Music Background: Choose from the library of background music offered by Submagic, or upload your own.
How to Use Submagic
Here’s how I used Submagic to automatically create 19 clips from a long-form video:
- Create a Submagic Account
- Create Magic Clips
- Add a Video
- Generate & View Clips
- Trim the Video
- Automatically Remove Silences
- Customize the Captions
- Add B-Roll
- Add Zoom Effects
- Apply Branding Elements
- Export Your Video
Step 1: Create a Submagic Account

I started by going to submagic.co and hitting “Try for Free.”
Step 2: Create Magic Clips

After creating an account, I was taken to my dashboard. The dashboard was clean and simple, presenting me with two options: generate captions or create “magic clips” (short clips from longer videos). I selected the “magic clips” option.
Step 3: Add a Video

From here, there were three options to choose from:
- Paste a YouTube URL
- Upload a video (MP4 or MOV)
- Try the sample video that’s 47 minutes long

I pasted a YouTube interview with Anne Hathaway, and Submagic let me choose the language and duration: <30 seconds, 30-59 seconds, and 60-89 seconds.
I kept everything on “Auto” and hit “Get viral clips.”
Step 4: Generate & View Clips

Immediately, Submagic placed my video in my projects and started generating clips! It was estimated to take about 10-15 minutes to generate.

A few minutes later, my project was ready! I hovered over it and selected the pen icon to view my clips.

Submagic generated 19 clips from the ten-minute video I gave it. All of them had animated captions and emojis as well as virality scores. I previewed the videos by hitting the play button.

Hovering over the videos were two icons: scissors and a pen.
Step 5: Trim the Video

Selecting the scissors allowed me to trim my video.

At the top of the transcript was a chapter bar where I could quickly jump to different video parts. If there were specific parts of the video I wanted to find, I could type in keywords to find it by selecting the magnifying glass and searching for it.

Hovering over the transcript, I could add parts of the transcript to the selection by hitting the “+” icon.
Step 6: Automatically Remove Silences

To automatically remove silences from my clip, I clicked “Remove Silences” (available on the Pro and Business plans).
Step 7: Customize the Captions

Selecting “Captions” at the top allowed me to customize my caption styles. Changing the font, color, and size was incredibly easy!
Step 8: Add B-Roll

Selecting “B-roll” allowed me to add b-roll and zooms to my clip. I could manually add them by finding the part of the transcript I wanted to add it to and hitting the “+.”

Submagic automatically suggests videos that fit with the context of what was being said!
In this example, I selected part of the transcript where Anne Hathaway talks about rain. Submagic automatically suggested videos with rain in them to add as b-roll to my clip!
Step 9: Add Zoom Effects

The magnifying glass gave me different zoom effects I could apply to different parts of my clip.

Alternatively (if you’re on the Pro or Business plans), you can get AI to automatically add b-roll and zooms by hitting the “Magic b-rolls” and “Magic Zoom” buttons at the top.
I applied both of the magic b-rolls and zooms. While the zooms worked well, the b-roll clips that it added didn’t quite fit with what was being said.
Step 10: Apply Branding Elements

In the preview window on the right were a couple more options. I could add branding text and images, music, and change the video ratio.
Submagic comes with a library of images and music you can choose from, or you can add your own.
Step 11: Export Your Video
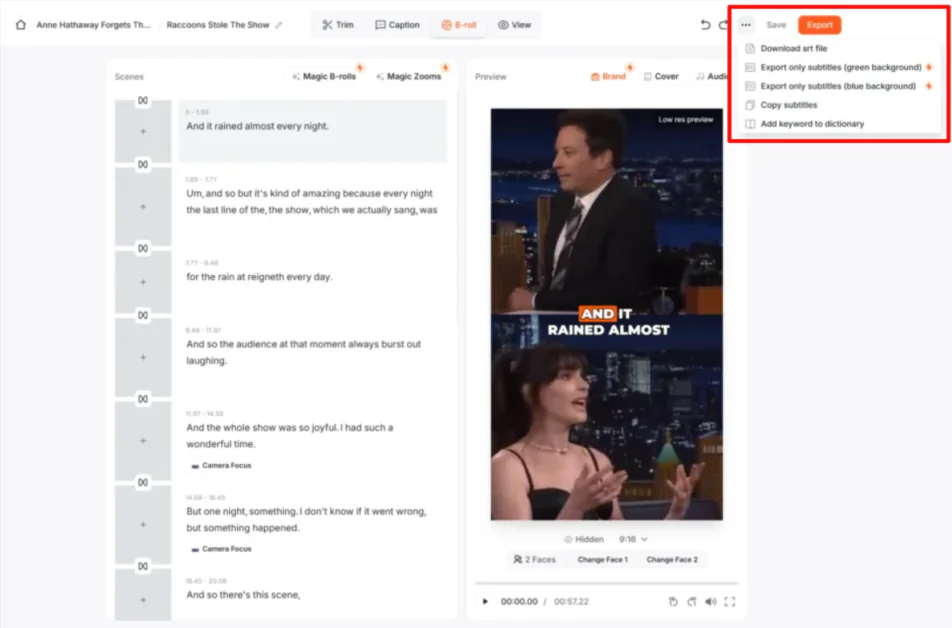
Once I was happy with everything, I could save and export the video (1080p, 2K, or 4K, depending on the plan) by selecting those options on the top right. Alternatively, I could select “More” (the three dots) to download the SRT file, only export the subtitles, copy the subtitles, or add keywords to the dictionary.
I exported my video to 4K. Here’s how it came out:
The quality is excellent, and the captions are engaging and accurate. However, I noticed it was lacking emojis.
Overall, Submagic made generating and editing clips from long-form videos fast and simple. It’s a powerful tool for quickly turning content into polished, shareable highlights!